Recording
Mixed tracks
Computer tools
Computer tools
Sequenced CD
Mastered CD
Computer tools
Text and art-work
MP3s
In case you’re not John Leckie—let’s face it you probably aren’t—here are some tips about recording new performances (as opposed to using sample CDs and a groove box). This assumes you’re recording at home in one room or shed, and you know what you want. If you don’t know anything about recording this is a start but it won’t be enough, you’ll need to do some more research.
I use traditional sounds. If you’re into extreme gated guitars, big mechanical drums and an artificial studio sound (auto-tune?) you’ll need advice from somewhere else, probably Sweden. This isn’t a complete recording guide.
Listen. You’ll be tempted by all kinds of distractions, gadgets and solutions. Use your ears. Think about the music and only do what you really need. Time is short but gizmos are infinite.
Learn how your gear does what you want. If you have to get the manuals out in mid-flow everything will stop. The need to learn is a strong reason not to chase magic new gear.
Remember what works, what doesn’t work, and what you want. When you’ve got some good recordings use them as your textbook. Keep notes unless your memory is flawless.
Organise so that recording is easy and keep a note of what goes where (especially wiring). Set things up so that you can more or less switch on and go. This is a strong incentive to keep it simple.
Don’t procrastinate. It’s easy to sit at a computer for hours, shuffling beats around, changing MIDI instruments and adjusting parameters. Great, if that’s what you want but screamingly dull otherwise. It’s very tempting to work up half an idea before you know where it’s going or whether it’s any good. There’s more about recording a song on the Songwriting page.
The basics are what matters. You can’t buy anything that makes everything better, or makes any sound more like it is. Get what you need for your music and ignore the rest. It’s not just the cost it’s the clutter, distraction and limited brain capacity.
Finish a project before you get extra equipment. New gear doesn’t solve problems. A good engineer with basic equipment gets better results than a poor engineer with all the best tools.
You’re unlikely to have a great open listening room and you’ll probably use headphones for monitoring recordings and for mixing. A good pair of headphones (closed-back for vocals or other acoustic sources) will do the job. Headphones make good recordings possible, as long as you check the results on a hi-fi or car stereo afterwards. My current favourites are Sennheiser HD 280 (closed) and 650 (open).
A basic dynamic microphone (e.g. SM58 Beta, or SM57 Beta for more edge) is fine and a basic valve condenser is very nice but don’t use anything cheaper, and unless your music is really delicate don’t bother paying more. If you use any acoustic sources this is a priority.
A single good reverb/delay/pitch unit saves a lot of anguish and imposes some discipline. Individual instruments may need their own boxes (e.g. for guitar treatment) but stick to one unit, preferably built-in, for the multi-track.
Analogue tape sounds excellent but digital hard disc recording is more convenient and reliable. Personally, I prefer using faders and switches to using a mouse, but computer multi-tracks are an alternative. Get as many tracks as you need and try to stick to a built-in mixer and effects. External mixers and effects will restrict routing and monitoring, or make it more complex and expensive.
It isn’t cheating to use a tuner, and unless you’ve got perfect pitch it’s a must. A pre-amp comes in handy for a valve and speaker sound if you DI, or for more extreme treatment, but if you don’t need one don’t get one.
Unless you’re a multi-instrumentalist you’ll probably use a keyboard of some kind—it’s also easier to record than the real thing (e.g. xylophone). There’s a massive choice of keyboards, synthesisers and sound modules, so once again, let the music dictate the simplest answer. There isn’t a single keyboard or module that does everything and the same applies to drums and percussion. If you can’t use real drums you can still get a useful drum sound from a drum machine, module or sequenced samples. Choose the sounds carefully and programme by copying drummers (try Family’s Burlesque, simple but nice).
The most impressive sounds are usually the most difficult to record alongside other instruments. Big sounds with effects are guaranteed to cause mixing problems.
A double-glazed room away from the neighbours is probably OK to keep your noise in. It helps if you DI everything you can, acoustic parts shouldn’t make too much noise. Don’t be too picky about keeping unwanted noise out—you won’t get complete silence. You might need to soundproof your multi-track but that’s quite easy. My hard disc recorder box fits an Akai DPS12 and is very effective but you might need to accommodate CD drawers or different connections.
By the time you notice the sound of your room you’ll have a better idea of how to listen to it, exploit and change it, and position microphones. If you need to deaden an area try blankets or duvets before spending money on acoustic foam.
If you have decided to use bass traps consider making your own rather than buying them: how to make bass traps using mineral wool.
Plug your inputs so you’re ready to start at any time. Set trim and levels so that a normal input will give you 0db on the recording meter when the fader is on its mark (usually halfway or three-quarters). Keep a note of what’s on each track (you will forget).
There’s more about recording the song itself on the Songwriting page.
If you’ve only just finished recording, take a break. Allow enough headroom for the whole mix and fade up the tracks one by one until they’re audible. Only use your ears! Use the solo and mute to simplify what you’re listening to as you go. For practice, remix the same song several times and compare results. You should get a good mix every time but they will all be different.
You could mix all your life and never get good enough to adjust the faders continually. If you’ve got great ears and can mix actively right through the track, do it. Otherwise get a good level and leave well alone wherever possible.
The Holy Grail of mixing is getting all the tracks to sit just right. Sometimes they don’t. If remixing fails, look at the tracks. Do they have different effects or different settings? The same reverb (even a smidgen) can help. Otherwise try EQ but remember, nature sometimes makes tracks that simply won’t live together. Ridley Scott says most directors don’t admit the role of luck in making a good film—the same is true of making records. The difference is we can remake a record in a couple of hours if it doesn’t work the first time.
There is an art to mixing and engineering that goes way beyond this. Professionals build complex and detailed sound pictures but pro-engineering isn’t necessary for the simple recordings I make.
Tape recordings sound warm because tape has natural compression and bass lift. Overloads and peaks are distorted kindly on tape. MiniDisc (ATRAC) has some of these characteristics and portable machines often compress the mic input too. With today’s digital recorders you might use a compressor to emulate a tape sound or to tame live performances.
Compression can also completely alter the character of a performance with heavy reverb and gating, or other unnatural effects.
If there’s too much signal a digital recording is shot. Input compression is a must for digital recording unless you can leave enough headroom without it. If you’re using an all-in-one digital system you may need an external analogue compressor (a digital compressor won’t help).
EQ is useful for separating sounds that compete in the same frequency range. If you have to use EQ it’s normally better to cut rather than boost. So, instead of boosting the top, try to cut the bottom and then increase the overall level. Cutting lower frequencies is less noticeable than cutting the top. Bear in mind people are highly sensitive to the frequency range of speech (around 3kHz) and take care tweaking that area. Finally, most sounds occupy the bottom half of the frequency range and changes below 10kHz have many more distinct effects than changes above. The whole range from 10 kHz to 20 kHz is very high top end.
Reverb can be used to put sounds in a particular space or as an obvious effect. The heavier the reverb and the more programmes you use the bigger the mixing headache. It can be tempting to overdo it. Remember, if it’s noticeable while you’re recording and mixing, it’ll be even more noticeable afterwards.
There are some good books on the recommended reading list.
After multi-track recording there are several possible routes to take. Stereo CD-Rs and MP3s can be made directly on some hardware and software multi-tracks, and even on some keyboard workstations. There are many different modular and all-in-one options. If you’re a beginner you’ll need to understand the audio functions of a computer. This page doesn’t cover:
Here are the main steps from completed multi-track recordings to duplicated CDs ready to mail out, and MP3s for downloading.
| multi-track Recording | stereo Mixed tracks | stereo Computer tools | stereo demo Computer tools | |||
| stereo Sequenced CD | ||||||
| stereo Mastered CD | final stereo Computer tools | |||||
| CD Text and art-work | Duplicated CDs | mono / stereo MP3s | ||||
| Mail order | Downloads | |||||
Unless you’re recording on a computer (DAW), you’ll need to get your tracks into a computer at some point to upload them to the web site. You can use USB or Firewire boxes, dedicated sound-cards, CDR/RW, or manufacturers audio line inputs on the computer. In my experience digital transfers can be unpredictable, so the fewer there are the better (USB audio problems). Here are the main options.
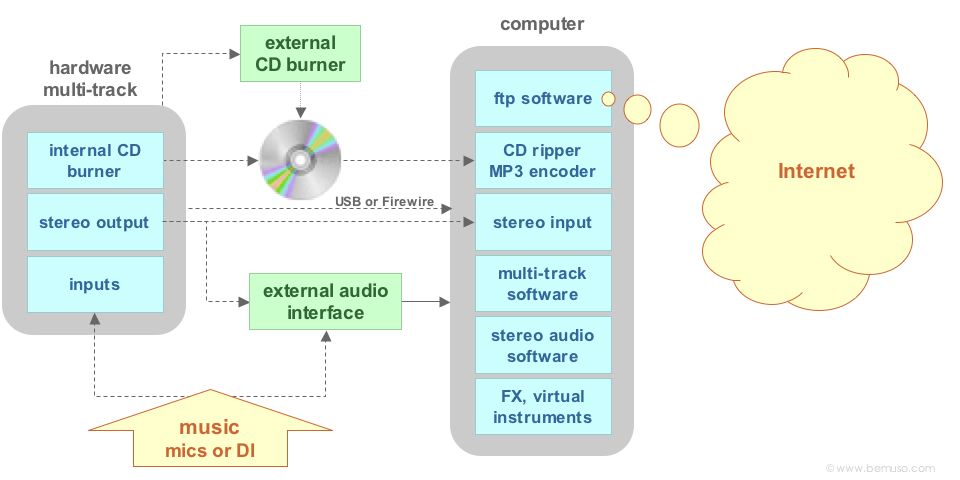
Unless the tracks are ready to upload to your web site and ready to duplicate on CD you may need to do some work on a computer. If you’ve got an all-in-one multi-track you probably won’t need any other audio software. Otherwise you’ll need additional tools for tidying the stereo tracks and burning a complete CD-R master.
There are several digital stereo editors for recording audio onto computer and trimming and fading stereo tracks. This makes a multi-track stereo mix completely tidy—tracks the right length, silent at each end, and with clean start and end fades if necessary. QuickTime Pro is a cheap option with basic cut and paste functions for audio files.
You can use your jukebox or playlist software for:
If you need to do additional audio work on your computer there’s bound to be some software that’ll do it (even multi-band compression if you want to try your hand at mastering).
There’s more about finishing, burning, pricing and packaging CDs in CD release and CD costs.
You’ll accumulate a lot of information about your songs and recordings. Computers are good for word processing and filing but you can’t make quick changes as easily as you need to. Keep lyrics, arrangements, patches and other notes ready on paper so that you can amend them with a pen. If you have hundreds of songs and recordings, a database is useful. You’re welcome to use my Filemaker 5 studio database. There’s a Windows Zip file and Mac Stuffit file, both are about 100k.
![]()
![]()
![]()